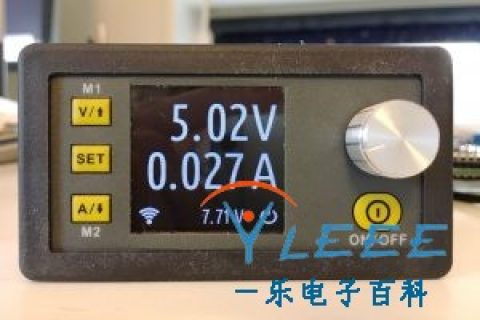
图解十步教你把普通开关电源模块改可调压电源
作者: kangdage
昨天文字说明了下如何改可调,今天有翻到两个电源模块,准备改了做可调电源用。
拍的不是很仔细,大家将就着看。
第一次发图文,又不懂的大家尽管提。
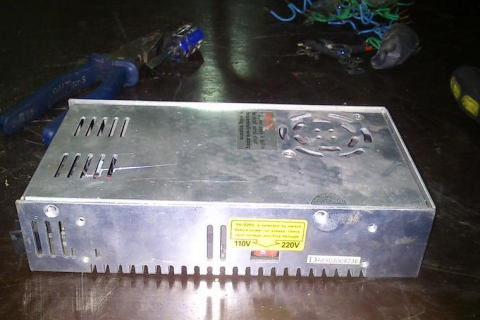
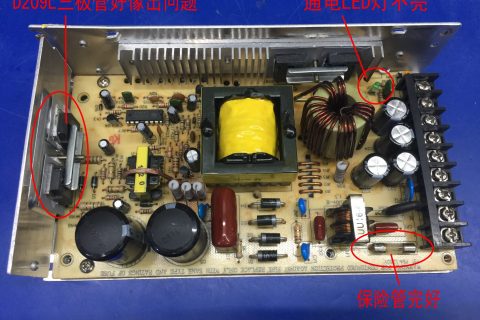
今天翻出来的两个电源模块,现场拆回来的旧的,很脏但没坏。
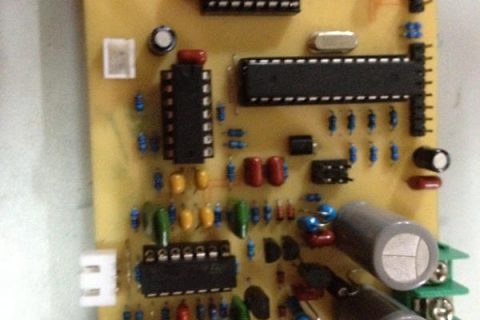
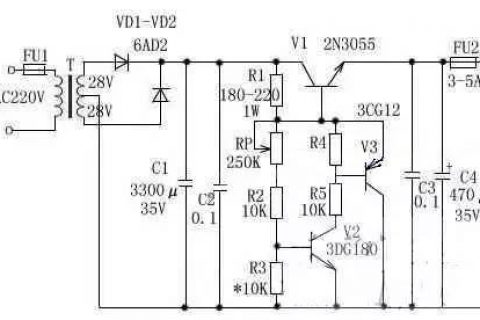
懒得画了,从网上找到的电路图。
以上电路基本和手里的模块电路相同,大家可以参考下,对比手上的模块。
可以看出这个电路比atx的简洁,没有需要大面积拆除的部分。
有我们需要的恒流恒压控制环路,不需要刻画pcb。
整体改造顺利的话半天就可搞定。
首先先肢解模块,我拆的比较彻底实际只要能取出电路就可以了。
因为是就模块,需要清洗和涂硅脂,所以就拆散了。
第一个模块是带风扇的,风扇已经废了。
开上盖。
俯视内部,灰尘遍布。
取出电路板后的躯壳。
取出的电路板,大家拆到这里就好了。
模块的特征已经很明显,两个功率管,两个高压电容,一个主变,还有一个驱动变压器,当然还有tl494。
电路板反面。
后面,注意保护绝缘垫。
接线端子,最左侧的电位器是微调输出的。
功率三极管,两个。
主变,肖特基,滤波电感,输出电容。
再拆另一个,先拆掉右边的那颗螺丝。
端子排旁边还有一颗。
向左一推,就能拿下来了。
这个相对干净些,同样的两个高压电容,两个功率管,一个控制变压器,tl494芯片。
拆下外壳外边剩余的螺丝。
即可取出电路板。
看到额外的散热片了没,比带风扇的那个强。
同样端子排旁边有个微调电位器。
右下角的就是tl494,除此之外没有别的芯片。
固定功率管的螺丝,拆。
背面还带绝缘膜,不错!
去掉看看。
再近点看看,大面积的铺铜是功率输出部分。
拆除散热片。
功率管近照。左边是高压电容,图中间是控制变压器,右边是tl494。
高压电容和电压转换开关,不出国的话直接把开关拆掉就好。
输入滤波部分。
tl494特写。
肖特基特写。
暂时用不到的外壳和螺丝,堆一起。
杂乱的工作台,必须收拾下了,没有地方下手了。
先去给电路板洗澡,回来再收拾战场。
洗完澡的电路板,干净多了。
等待电路板干燥的时候收拾下战场。
干净多了吧!
顺便晒晒家当。
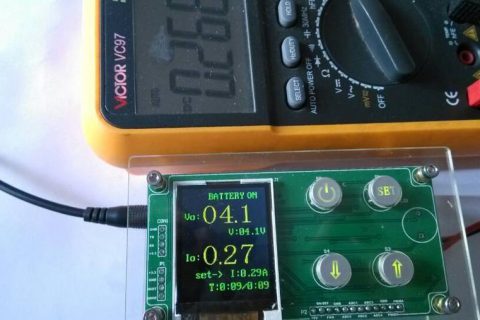
万用表,没有一个好表笔。在厂里用,不想掏自己钱买。
利利普示波器,注意看波形。
这里干扰很大,旁边就是高压室,毛刺很多。
红丝的是一通道,探头已短接,毛刺是平板电源的,为此测试时要关掉它。
平板和可调电源,还有元件库。
看我的元件库,纸隔板胡的,分类存放。
里面用自封袋储存。
食堂的盒饭,赞一个,只要五块钱。
第一步:去掉自启动电阻。
为什么要去掉自启动电阻呢?
因为这个电源上电时,高压部分会产生微弱的自激震荡,次级感应出一定能量。
达到tl494启动门限时,tl494接管控制为它激可控,使输出受控。
这个震荡对我们来说无用,且有害。
在tl494未启动之前或是关闭后,电源处于非控自激状态,输出不受控制。
图中红圈标记的就是。
在电源里找到功率三极管的c极(一般为中间脚),会看到连接有一个二极管一个电阻。
这个电阻一般就为启动电阻,它直接或间接连到三极管b极。
有的地方是一个电阻,有的用两个电阻串联,以分摊功耗和压降。
对应模块到里面。
拆启动电阻前元件面,图中1/2w的电阻就是。
背面pcb走线。
拆出来的电阻和拆除后的电路板。
另一个模块拆前元件面。
背面pcb走线。
拆出的电阻和拆除后的电路板。
DSC_0085.JPG (312.9 KB, 下载次数: 48)
2014-6-21 19:45 上传
这个电阻一般为300k,如果有两个就是150k每个。
拆除后加电,模块不能启动就对了。
第二步:拆除tl494原供电电路。
启动电路拆除后原供电电路也就没用了,拆之。
如果不拆也可以工作,只是tl494工作电压变化,可能会有参数变化。
原供电电路为了保证启动顺利和可靠控制选取的工作电压一般较高,约20v左右且随负载变化。
红圈内的二极管既是。
黄圈内的电阻有的是在电容和二极管之间,需要拆除。
有的是在图中位置,需要用导线短接。
对应线路板二极管一般在主变附近,只连接辅助绕组和一个低压电容的小肖特基。
元件面,输出电抗旁边的二极管就是。
电路板背面连线,这一个辅助绕组没有走主变接线柱。
拆除后。
拆除的东西放到原位。
拆除的电阻需短接。
另一个模块元件面,隐藏在主变下面。
背面走线。
换个方向看。
拆除后,这个电路原电阻位就是短接线。
拆除的原件放回原处。